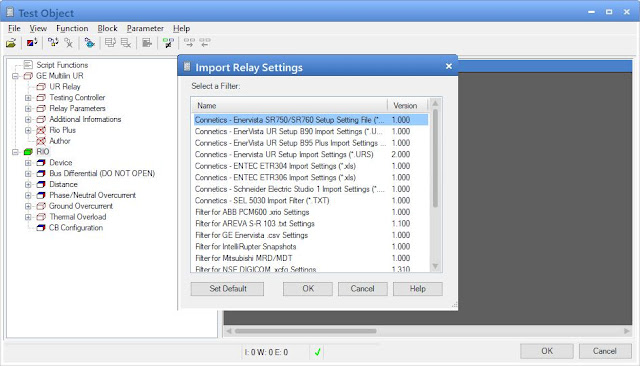
Welcome to my page and welcome to another series of tutorials. This series called Omicron Import Filter. Import Filter is a useful feature added in the XRIO (eXtended Relay Interface by Omicron) converter which also known as Test Object inside the Omicron Control Center test document. Import filter is use to import data from a different source outside the Test Universe software like relay settings file of any format created by a relay software.
Import Filters are accessed thru File > Import Relay Settings in the Test Object. In the dialog that opens select one of the available filters, and set it to be the default one.
In this tutorial (first part), I will show you how to create new import filter from the scratch. This can be written using .NET languages like VB, C# and etc.
Technically the Import Filter is a .NET assembly that contains a class that is derived from the FilterBase class in the OMXRIOFilter assembly of XRIO. The built assembly has to be placed into a certain subdirectory of Test Universe together with an .xriofilter file.
The .xriofilter file is the definition file for an XRIO filter. It contains the definition of the filter and the permanent parameters. It is the interface between the XRIO software and the filter assembly. The Import Filter assembly has to be loaded by XRIO only when an import or export operation is really executed. To let the user select a filter, the definitions from the .xriofilter files are sufficient.
<?xml version="1.0" encoding="utf-8"?>
<XRio_ImportFilter xmlns:xsi="http://www.w3.org/2001/XMLSchema-instance">
<!-- Global Filter Identifier -->
<ID>SampleFilter</ID>
<!-- Filter version number -->
<Version>1.0</Version>
<!-- Filter display name -->
<Name>Sample XRIO Filter for XML Files</Name>
<!-- Relative path name of the filter assembly -->
<AssemblyPath>SampleFilter\SampleFilter.dll</AssemblyPath>
<!-- Name of the FilterBase derived class -->
<AssemblyClassName>MyFilter.Filter</AssemblyClassName>
<!-- Flag if export is supported (yes/no) -->
<ExportSupported>yes</ExportSupported>
<!-- Flag if results dialog box should be shown (yes/no) -->
<Parameter Type="All" Name="ShowResults">yes</Parameter>
<!-- Variables not set in this file: "FilePath" Path that is normally prompted by FileOpen dialog-->
</XRio_ImportFilter>
Now, let's start create a new Import Filter. In this tutorial, I will use Visual Studio .NET (Visual Basic or VB). In my case I'm using Visual Studio 2019.
Now, open the Visual Studio .NET soft ware then create a new Visual Basic Class Library (.NET Framework). Set the project name to MyImportFilter, then in the framework choose the recent one in my case .NET Framework 4.7.2.
Once the project is loaded, a new Class1 is automatically created, rename this class to SampleFilter by right clicking to Class1 at the solution explorer then click Yes when rename prompt displayed.
Before we start writing codes, we need to add external assembly references from Omicron Shared Libraries. To do this, right click on to the References at the solution explorer or via Project menu at the top then click Add Reference. Reference Manager will display, click the Browse button below, then navigate to this location %PROGRAMFILES(x86)%\OMICRON\Test Universe\SharedAssemblies for 64-bit computer or %PROGRAMFILES%\OMICRON\Test Universe\SharedAssemblies for 32-bit computer then celect the "OMXRIOData.dll" and "OMXRIOFilter.dll" assembly and click Add then click OK.
The to library should appear in the reference node at the solution explorer.
Now, inherits the FilterBase class of the OMXRioFilter inside the SampleFilter class that we've created by typing the Inherits OMXRioFilter.FilterBase then hit Enter key to auto generate the sub methods and functions of the FilterBase class.
Public Class SampleFilter
    Inherits OMXRioFilter.FilterBase

    Public Overrides Sub SetParameter(isImport As Boolean, paramName As String, paramValue As String)
        Throw New NotImplementedException()
    End Sub

    Public Overrides Function ExecuteImport() As Boolean
        Throw New NotImplementedException()
    End Function

    Public Overrides Function IsExportSupported() As Boolean
        Throw New NotImplementedException()
    End Function

    Public Overrides Function ExecuteExport() As Boolean
        Throw New NotImplementedException()
    End Function

    Public Overrides Function GetParameter(isImport As Boolean, paramName As String) As String
        Throw New NotImplementedException()
    End Function

    Public Overrides Function ShowParameterDialog(isImport As Boolean) As Boolean
        Throw New NotImplementedException()
    End Function
End Class
Once the codes has been generated, we're going to modify the ShowParameterDialog function. This function will be executed first once we run this ImportFilter in the XRIO converter. Copy the code below then replace the Throw New NotImplementedExceprion(). Then comment out the command line of the rest of the functions and procedures
Public Class SampleFilter
    Inherits OMXRioFilter.FilterBase

    Public Overrides Sub SetParameter(isImport As Boolean, paramName As String, paramValue As String)
        'Throw New NotImplementedException()
    End Sub

    Public Overrides Function ExecuteImport() As Boolean
        'Throw New NotImplementedException()
    End Function

    Public Overrides Function IsExportSupported() As Boolean
        'Throw New NotImplementedException()
    End Function

    Public Overrides Function ExecuteExport() As Boolean
        'Throw New NotImplementedException()
    End Function

    Public Overrides Function GetParameter(isImport As Boolean, paramName As String) As String
        'Throw New NotImplementedException()
    End Function

    Public Overrides Function ShowParameterDialog(isImport As Boolean) As Boolean
        MsgBox("You have successfully created the import filter.", MsgBoxStyle.OkOnly, "Import Filter")
        Return True
    End Function
End Class
This code will display a message box just to let us know that the code has been executed. I know this is not exciting but in the next tutorial I will show you how to create a user interface and I will show you how to import external data into XRIO converter.
This is only an introduction on how to create new Import Filter.
Now, build or compile the project and it should be no error.
Once the build or compile completed with no error, add new XML file by clicking Add New Item in the Project menu at the top. The Add New Item window will display. Select the installed common items node on the left side and scroll to the very end and find XML File then select it and set the name to SampleFilter.xriofilter then click Add button.
Once the file added, copy the code below and replace the SampleFilter.xriofilter contents then save the project.
<?xml version="1.0" encoding="utf-8"?>
<XRio_ImportFilter xmlns:xsi="http://www.w3.org/2001/XMLSchema-instance">

	<!--  Global Filter Identifier	-->
	<ID>MyImportFilter.SampleFilter</ID>

	<!--  Filter version number	-->
	<Version>1.000</Version>

	<!--  Filter display name	-->
	<Name>Sample Import Filter</Name>

	<!--  Relative path name of the filter assembly	-->
	<AssemblyPath>MyImportFilter\MyImportFilter.dll</AssemblyPath>

	<!--  Name of the FilterBase derived class  	-->
	<AssemblyClassName>MyImportFilter.SampleFilter</AssemblyClassName>

	<!--  Flag if export is supported (yes/no) -->
	<ExportSupported>no</ExportSupported>

	<!--  File extension mask for FileOpen dialog	-->
	<Parameter Type="All" Name="FileExtensionMask">*.URS</Parameter>

	<!--  File extension name for FileOpen dialog  	-->
	<Parameter Type="All" Name="FileExtensionName">Sample Import Filter Setting File</Parameter>

	<!--  Storage medium
				* File			save/load from file
				* String			save/load from string	-->
	<Parameter Type="All" Name="Storage">File</Parameter>

	<!--  Flag if results dialog box should be shown (yes/no) -->
	<Parameter Type="All" Name="ShowResults">yes</Parameter>

	<!--  Variables not set in this file:
		"FilePath"		Path that is normally prompted by FileOpen dialog
		"XMLContent"	Variable for file content if storage medium is string
		"LocaleSettings"	Setting for used locale
	-->
</XRio_ImportFilter>
In the solution explorer, select the SampleFilter.xriofilter file then change the Copy to Output Directory property to Copy if newer. This will copy the file in the output directory when we compile or build the project.
Then select the two reference OMXRioData and OMXRioFilter at solution explorer then set the Copy Local property to False. This will not copy these assembly file in the output directory when we build the project. Because by default, this will copy these assembly to output directory.
Now, open the project properties by clicking the MyImportFilter Properties in the Project menu. Once the project properties open, navigate to Compile tab then uncheck the Generate XML documentation file otherwise XML file will be generated when building the project.
Click the Advanced Compile Options button then set the Generate debug info to none. We just want to generate two files (MyImportFilter.dll and SampleFilter.xriofilter) only when building the project.
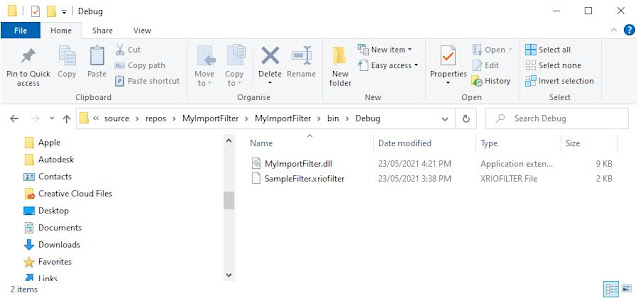
Build or compile the project then go to the output directory. Right clicking to MyImportFilter project at Solution Explorer clicking the Open Folder in File Explorer. Open the bin/Debug folder and the MyImportFilter.dll and SampleFilter.xriofilter should be in there.
Now, we have successfully created new Import Filter. In the next tutorial, I will show you how to install and use this in the XRIO converter and using this via script. See you next time.


Comments
Post a Comment