Welcome to the fourth part of the Omicron Import Filter tutorial series. In this tutorial, I will show you how to open the relay setting file that generated from the relay software and manipulate the relay setting data inside the Import Filter. Every relay setting that generated by the different relay software are unique that's why data manipulation is also different. In this tutorial, we will focus on MiCOM P12x series, we will going to use the Schneider Electric software called Easergy Studio. In Easergy Studio, we're going to export the relay setting into TXT format because it's easy to manipulate the data. Make sure you have downloaded the Easergy Studio software.

Download the sample relay setting file in this link (Sample Setting File). Extract the file then open it in the Easergy Studio.

Once the setting file is loaded, export the setting file and select the Export to Text file format and make sure the include hidden settings is checked. Click OK button and save it to a known directory.

Sample.P123 V10-V14.000.txt file will be generated in the selected directory. This file is contains relay setting information and we're going to load this in the Import Filter that we created.

Open the Visual Studio project MyImportFilter that we've created in the previous tutorial (Creating A User Interface In Omicron Test Universe Import Filter). Once the project is loaded, open the FormSample.vb then double click the Browse button to open the button's code. Copy the line of code below then paste it to the main declaration of the form.
Private TextFileContent As String
Copy the codes below then replace the ButtonBrowse_Click method.
Private Sub ButtonBrowse_Click(sender As Object, e As EventArgs) Handles ButtonBrowse.Click
    Using dlgOpen As New Windows.Forms.OpenFileDialog
        With dlgOpen
            .Title = "Open Relay Setting File"
            .Filter = "Text files (*.txt)|*.txt"
            .Multiselect = False
            If .ShowDialog = Windows.Forms.DialogResult.OK Then
                If System.IO.File.Exists(.FileName) Then
                    Using TextStreamReader As System.IO.StreamReader = New System.IO.StreamReader(.FileName)
                        TextFileContent = TextStreamReader.ReadToEnd()
                        TextStreamReader.Close()
                    End Using
                    LoadTheTextFileContent()
                End If
            End If
        End With
    End Using
End Sub
That will give us an error because the LoadTheTextFileContent() was not declared. Copy the code below and paste it next to ButtonBrowse_Click method to get rid the error.
Private Sub LoadTheTextFileContent()
    Dim TextFileLines() As String = TextFileContent.Trim.Split(vbNewLine)
    Dim Table As New DataTable
    Table.Columns.Add("Parameter", GetType(String))
    For Each Line As String In TextFileLines.ToList
        Table.Rows.Add(Line)
    Next
    DataGridViewParameters.DataSource = Table
    DataGridViewParameters.Columns("Parameter").AutoSizeMode = Windows.Forms.DataGridViewAutoSizeColumnMode.AllCells
End Sub
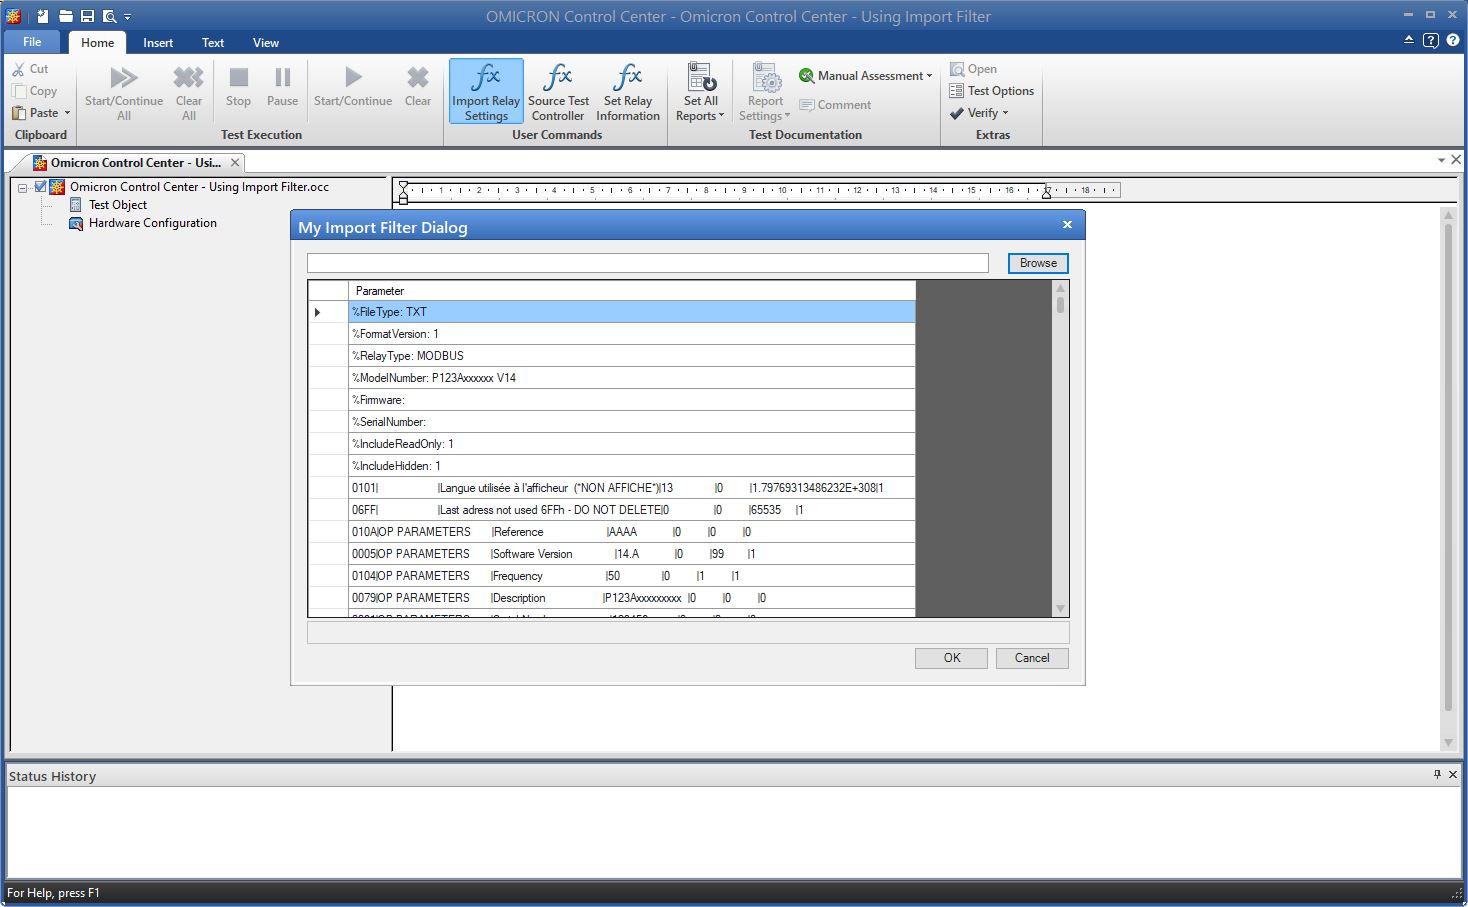
Now, compile or build the project then install the output file in the Import Filter installation directory. Check this link on how to install the Import Filter (Install And Use Newly Created Import Filter In Omicron Test Universe) then execute the Import Filter using the OCC document that can be found in this link (Omicron Control Center - Using Import Filter). Open the file that we've exported before (Sample.P123 V10-V14.000.txt) and content will be populated in the datagridview.
We have successfully open the exported setting file in our Import Filter but we're not finished yet. We need to process those text lines, because each line contains seven parameters. So, we need to parse them before importing them in the Xrio converter. I will show you that in the next tutorial. See you next time
Comments
Post a Comment