GE SR750/760 Relay Tutorials - Part 7: Linking Phase Overcurrent Protection Element Parameters To Overcurrent RIO Function
In this tutorial, shown linking of the Phase Overcurrent Protection Element parameters created in the previous tutorial into Overcurrent RIO function, defining overcurrent element characteristic, writing formula to use in the overcurrent element characteristic and using this template during the testing of the GE SR750/760 relay.
Welcome to the seventh part of GE SR750/760 Relay Tutorial series. If you haven't seen the previous tutorials, click the link below:
Open the test document that we used in the previous tutorial (Part 6).
Once the test document is loaded, open the test object. Make sure that the advanced view mode is selected to enable to link the parameters.
In the RIO block, open the Overcurrent block by double clicking on it then go to Elements tab. By default, there is one active element in the list. Click the button at the characteristic group to change the curve type. If there are multiple element in the list, select the element before clicking the button to change the selected curve.
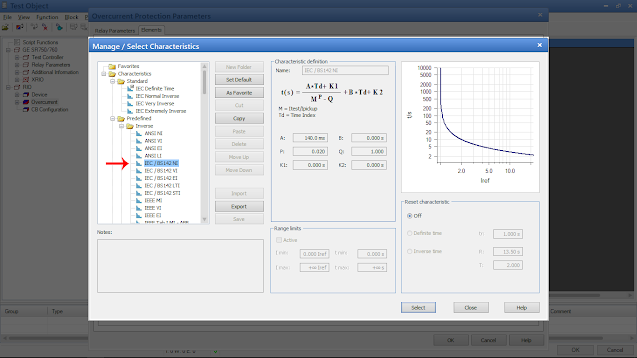
There are predefined curve characteristics on the left side, select the IEC / BS142 NI curve under Predefined » Inverse folder then click select button below. Click OK button to apply and close the changes.
Now, the curve has changed and automatically added its parameters, the phase time overcurrent parameters created in the previous tutorial will be linked here. Before that, there couples of changes has to be made before linking those parameters.
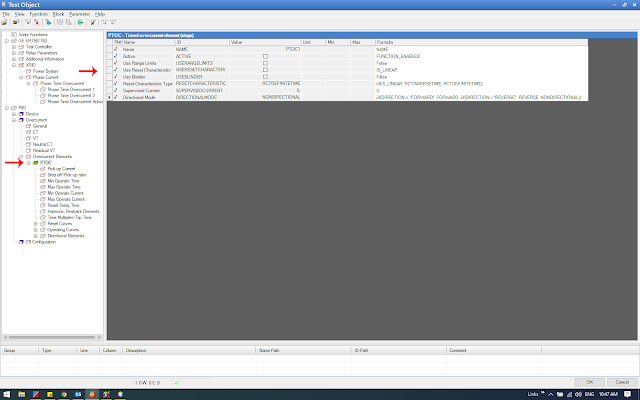
Change the Time Overcurrent Element2 block. Maybe its different in your computer, it might be Time Overcurrent Element or Time Overcurrent Element3. Right click on it then select Details and set the following details
Then enter and link the following formulas
In the RIO » Overcurrent » Overcurrent Elements » PTOC » Pick-up Current block, link the Ipickup,nom
In the RIO » Overcurrent » Overcurrent Elements » PTOC » Pick-up Current block, link the Nom. Time Multiplier
Go to Script Function block and insert the formula below.
Now go to RIO » Ovecurrent » Overcurrent Element » PTOC » Operating Curves » Inverse Parameter Curve block then enter and link the following formula below
In the next tutorial, were going to test the GE 760 relay using this template for overcurrent element.
See you next time.
Welcome to the seventh part of GE SR750/760 Relay Tutorial series. If you haven't seen the previous tutorials, click the link below:
Part 6: Creating Phase Overcurrent Protection Element Blocks and Parameters
GE SR750/760 Relay Tutorials
Open the test document that we used in the previous tutorial (Part 6).
Once the test document is loaded, open the
In the RIO block, open the Overcurrent block by double clicking on it then go to Elements tab. By default, there is one active element in the list. Click the button at the characteristic group to change the curve type. If there are multiple element in the list, select the element before clicking the button to change the selected curve.
There are predefined curve characteristics on the left side, select the IEC / BS142 NI curve under Predefined » Inverse folder then click select button below. Click OK button to apply and close the changes.
Now, the curve has changed and automatically added its parameters, the phase time overcurrent parameters created in the previous tutorial will be linked here. Before that, there couples of changes has to be made before linking those parameters.
Change the Time Overcurrent Element2 block. Maybe its different in your computer, it might be Time Overcurrent Element or Time Overcurrent Element3. Right click on it then select Details and set the following details
| RIO » Overcurrent » Overcurrent Elements | |
|---|---|
| Time Overcurrent Element2 | |
| ID | PTOC |
| Name | PTOC |
Then enter and link the following formulas
| RIO » Overcurrent » Overcurrent Elements » PTOC | ||
|---|---|---|
| Parameter Name | Formula | |
| Name | NAME | |
NAME | GE SR750/760 » XRIO » Phase Current » Phase Time Overcurrent » Phase Time Overcurrent Active » Name | |
| Active | FUNCTION_ENABLED | |
FUNCTION_ENABLED | GE SR750/760 » XRIO » Phase Current » Phase Time Overcurrent » Phase Time Overcurrent Active » Function Enabled | |
| Use Range Limits | False | |
| Use Reset Characteristic | IS_LINEAR | |
IS_LINEAR | GE SR750/760 » XRIO » Phase Current » Phase Time Overcurrent » Phase Time Overcurrent Active » Is Linear? | |
| Use Blinder | False | |
| Reset Characteristic Type | iif(IS_LINEAR, RCTINVERSETIME, RCTDEFINITETIME) | |
IS_LINEAR | GE SR750/760 » XRIO » Phase Current » Phase Time Overcurrent » Phase Time Overcurrent Active » Is Linear? | |
RCTINVERSETIME | RIO » Overcurrent » Overcurrent Elements » PTOC » Reset Characteristic Type » RCTINVERSETIME | |
RCTDEFINITETIME | RIO » Overcurrent » Overcurrent Elements » PTOC » Reset Characteristic Type » RCTDEFINITETIME | |
| Supervised Current | IL | |
IL | RIO » Overcurrent » Overcurrent Elements » PTOC » Supervised Current » IL | |
| Directional Mode | iif(DIRECTION = "FORWARD", FORWARD, iif(DIRECTION = "REVERSE", REVERSE, NONDIRECTIONAL)) | |
DIRECTION | RIO » Overcurrent » Overcurrent Elements » PTOC » Directional Mode | |
FORWARD | RIO » Overcurrent » Overcurrent Elements » PTOC » Directional Mode » FORWARD | |
REVERSE | RIO » Overcurrent » Overcurrent Elements » PTOC » Directional Mode » REVERSE | |
NONDIRECTIONAL | RIO » Overcurrent » Overcurrent Elements » PTOC » Directional Mode » NONDIRECTIONAL | |
"FORWARD" "REVERSE" | Manually type | |
In the RIO » Overcurrent » Overcurrent Elements » PTOC » Pick-up Current block, link the Ipickup,nom
| RIO » Overcurrent » Overcurrent Elements » PTOC » Pick-up Current | ||
|---|---|---|
| Parameter Name | Formula | |
| Ipickup,nom | PICKUP | |
PICKUP | GE SR750/760 » XRIO » Phase Current » Phase Time Overcurrent » Phase Time Overcurrent Active » Pickup | |
In the RIO » Overcurrent » Overcurrent Elements » PTOC » Pick-up Current block, link the Nom. Time Multiplier
| RIO » Overcurrent » Overcurrent Elements » PTOC » Time Multiplier/Trip Time | ||
|---|---|---|
| Parameter Name | Formula | |
| Nom. Time Multiplier | MULTIPLIER | |
MULTIPLIER | GE SR750/760 » XRIO » Phase Current » Phase Time Overcurrent » Phase Time Overcurrent Active » Multiplier | |
Go to Script Function block and insert the formula below.
36 | Public Function GetIDMTcoefficientValue(ByVal CurveName As String, ByVal Coefficient As String) As Double |
64 | Public Function GetIDMTName(ByVal CurveName As String) As String |
Now go to RIO » Ovecurrent » Overcurrent Element » PTOC » Operating Curves » Inverse Parameter Curve block then enter and link the following formula below
| RIO » Overcurrent » Overcurrent Elements » PTOC » Operating Curves Inverse » Parameter Curve | ||
|---|---|---|
| Parameter Name | Formula | |
| Active | FUNCTION_ENABLED | |
FUNCTION_ENABLED | GE SR750/760 » XRIO » Phase Current » Phase Time Overcurrent » Phase Time Overcurrent Active » Function Enabled | |
| Name | GetIDMTName(CURVE) | |
CURVE | GE SR750/760 » XRIO » Phase Current » Phase Time Overcurrent » Phase Time Overcurrent Active » Curve | |
| A | GetIDMTcoefficientValue(CURVE, "A") | |
CURVE | GE SR750/760 » XRIO » Phase Current » Phase Time Overcurrent » Phase Time Overcurrent Active » Curve | |
| B | GetIDMTcoefficientValue(CURVE, "B") | |
CURVE | GE SR750/760 » XRIO » Phase Current » Phase Time Overcurrent » Phase Time Overcurrent Active » Curve | |
| C | GetIDMTcoefficientValue(CURVE, "C") | |
CURVE | GE SR750/760 » XRIO » Phase Current » Phase Time Overcurrent » Phase Time Overcurrent Active » Curve | |
| D | GetIDMTcoefficientValue(CURVE, "D") | |
CURVE | GE SR750/760 » XRIO » Phase Current » Phase Time Overcurrent » Phase Time Overcurrent Active » Curve | |
| E | GetIDMTcoefficientValue(CURVE, "E") | |
CURVE | GE SR750/760 » XRIO » Phase Current » Phase Time Overcurrent » Phase Time Overcurrent Active » Curve | |
| F | GetIDMTcoefficientValue(CURVE, "F") | |
CURVE | GE SR750/760 » XRIO » Phase Current » Phase Time Overcurrent » Phase Time Overcurrent Active » Curve | |
In the next tutorial, were going to test the GE 760 relay using this template for overcurrent element.
See you next time.


Comments
Post a Comment